1. Úvod
The SPL 2Control is a compact and user-friendly stereo monitor controller designed to provide comprehensive control over your digital audio workstation's (DAW) monitoring functions. It ensures high-quality audio reproduction through both studio monitors and headphones, allowing you to hear every detail of your mix. Key features include a precise speaker volume potentiometer, active circuitry for sound integrity, and a unique Crossfeed control for accurate headphone monitoring that simulates a stereo speaker image.
2. Bezpečnostné pokyny
- Pred použitím zariadenia si pozorne prečítajte tieto pokyny.
- Uschovajte si tento návod pre budúce použitie.
- Nevystavujte jednotku dažďu ani vlhkosti, aby ste predišli požiaru alebo úrazu elektrickým prúdom.
- Zabezpečte dostatočné vetranie; neblokujte žiadne vetracie otvory.
- Používajte iba doplnky/príslušenstvo špecifikované výrobcom.
- Počas búrok s bleskami alebo ak zariadenie dlhší čas nepoužívate, odpojte napájací kábel.
- Všetok servis prenechajte kvalifikovanému servisnému personálu.
- Neumiestňujte zariadenie do blízkosti zdrojov tepla, ako sú radiátory, ohrievače, sporáky alebo iné zariadenia (vrátane amplifikátory), ktoré produkujú teplo.
3. Obsah balenia
Po vybalení sa uistite, že sú súčasťou balenia nasledujúce položky:
- 1 x SPL 2Control Module
- 1 x Napájací kábel
- Táto používateľská príručka
4. Produkt skončilview
4.1 Ovládacie prvky a indikátory na prednom paneli
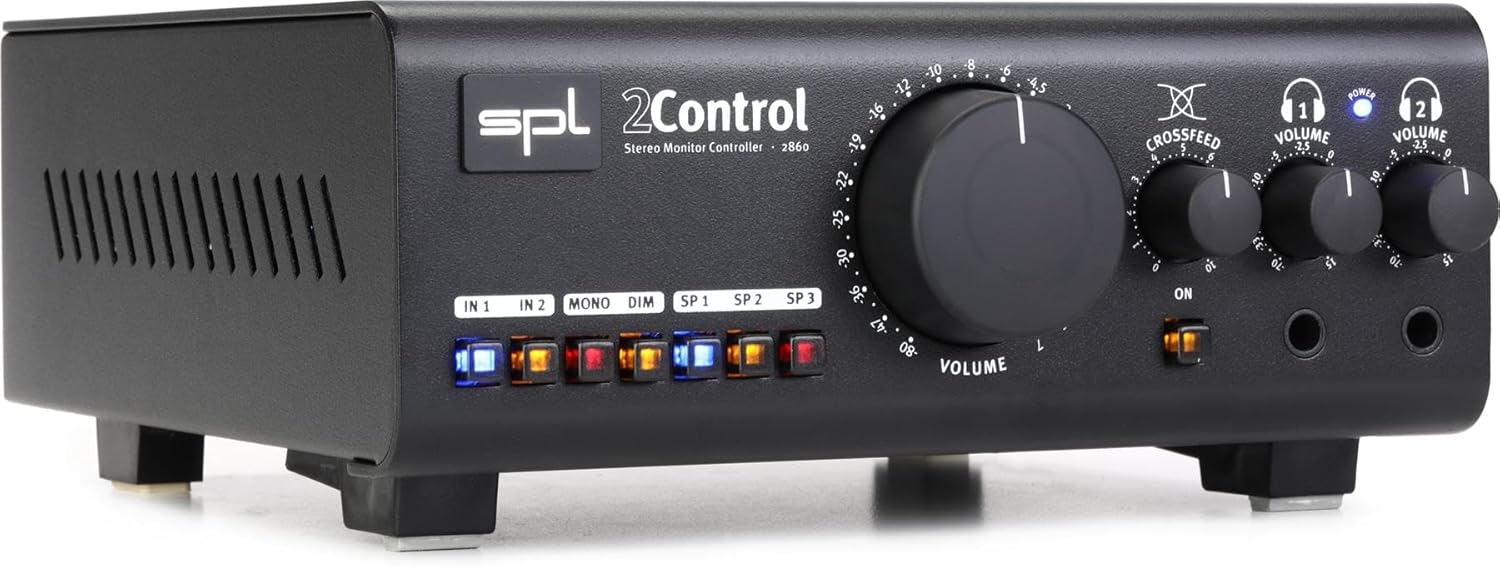
Obrázok 1: Front Panel of the SPL 2Control Stereo Monitor Controller.
This image displays the front panel of the SPL 2Control. From left to right, it features input selection buttons (IN 1, IN 2), function buttons (MONO, DIM), speaker output selection buttons (SP 1, SP 2, SP 3), a large central master VOLUME knob, a CROSSFEED knob, and two individual headphone VOLUME knobs with corresponding headphone output jacks. A power indicator LED is visible above the headphone controls.
- IN 1 / IN 2 Buttons: Selects the active stereo input source.
- Tlačidlo MONO: Sums the stereo signal to mono for compatibility checking.
- Tlačidlo DIM: Reduces the output volume by a fixed amount (e.g., -20dB) for temporary level reduction.
- SP 1 / SP 2 / SP 3 Buttons: Selects the active stereo speaker output pair.
- Gombík VOLUME: Master volume control for selected speaker outputs.
- CROSSFEED Knob: Adjusts the stereo panorama for headphone monitoring to simulate a speaker listening environment.
- HEADPHONE VOLUME 1 / 2 Knobs: Independent volume controls for the two headphone outputs.
- HEADPHONE 1 / 2 Jacks: 1/4-inch stereo headphone outputs.
- LED napájania: Indikuje, že jednotka je zapnutá.
4.2 Rear Panel Connections (Inferred)
The rear panel typically houses the audio input and output connections, as well as the power input. Based on common audio equipment and product specifications, you can expect:
- Analógové vstupy: Balanced XLR or TRS inputs for connecting your audio interface or mixer.
- Výstupy reproduktorov: Multiple sets of balanced XLR or TRS outputs for connecting up to three pairs of studio monitors.
- Príkon: Connector for the included power cord.
5. Nastavenie
- umiestnenie: Position the SPL 2Control on a stable, flat surface, ensuring adequate ventilation around the unit.
- Napájanie: Connect the provided power cord to the power input on the rear panel of the 2Control and then to a suitable AC power outlet.
- Vstupné pripojenia: Connect the stereo outputs of your audio interface, mixer, or other audio source to the IN 1 and/or IN 2 inputs on the rear panel using balanced XLR or TRS cables.
- Pripojenia reproduktorov: Connect your studio monitors to the SP 1, SP 2, and/or SP 3 outputs on the rear panel using balanced XLR or TRS cables. Ensure correct left and right channel connections.
- Headphone Connections: Plug your headphones into the HEADPHONE 1 and/or HEADPHONE 2 jacks on the front panel.
- Počiatočné zapnutie: Ensure all volume controls are set to their minimum positions before powering on the unit. Then, connect the power cord to the wall outlet. The POWER LED on the front panel will illuminate.
6. Návod na obsluhu
- Výber vstupu: Stlačte buď tlačidlo V 1 or V 2 button to select your desired audio source. The active button will illuminate.
- Selecting Speaker Outputs: Stlačte tlačidlo SP 1, SP 2, alebo SP 3 button to route the audio to the corresponding pair of studio monitors. Only one speaker output can be active at a time.
- Adjusting Master Volume: Slowly turn the large VOLUME knob clockwise to increase the listening level for the selected speaker outputs. Turn counter-clockwise to decrease.
- Mono sčítanie: Stlačte tlačidlo MONO button to sum the stereo signal to mono. This is useful for checking phase compatibility and mix balance. Press again to return to stereo.
- Funkcia stmievania: Stlačte tlačidlo DIM button to temporarily reduce the output volume. This is useful for quick conversations or when you need to lower the volume without losing your main volume setting. Press again to restore the original volume.
- Monitorovanie slúchadiel:
- Plug your headphones into the desired headphone jack (HEADPHONE 1 or 2).
- Upravte jednotlivca HEADPHONE VOLUME 1 or 2 knob to set the listening level for your headphones.
- Použite CROSSFEED knob to adjust the stereo image for headphone listening. Turning it clockwise increases the crossfeed, simulating a more natural speaker-like stereo field by blending the left and right channels slightly.
7. Údržba
- Čistenie: Na čistenie exteriéru jednotky použite mäkkú, suchú handričku. Nepoužívajte tekuté čistiace prostriedky ani rozpúšťadlá.
- Vetranie: Ensure that the ventilation slots are kept clear of dust and debris to prevent overheating.
- Ukladací priestor: Ak zariadenie skladujete dlhší čas, odpojte ho od elektrickej siete a uskladnite ho na chladnom a suchom mieste.
8. Riešenie problémov
| Problém | Možná príčina | Riešenie |
|---|---|---|
| Žiadny zvuk z reproduktorov. |
|
|
| Zo slúchadiel nepočujete žiadny zvuk. |
|
|
| Skreslený zvuk. |
|
|
9. Špecifikácie
| Funkcia | Detail |
|---|---|
| Názov modelu | 2 Control (also known as 2860) |
| Značka | SPL |
| Typ reproduktora | Monitor |
| Odporúčané použitia | Control, Volume for Monitors |
| Kompatibilné zariadenia | Monitors, Speakers |
| Konfigurácia kanálov priestorového zvuku | 2.0 |
| Farba | Čierna |
| Zahrnuté komponenty | 1 x SPL Control Module |
| Rozmery produktu (D x Š x V) | 8.66 cm x 8.46 cm x 3.15 cm |
| Hmotnosť položky | 7.06 libry (približne 3.2 kg) |
| Zdroj napájania | Káblové elektrické |
| Technológia pripojenia | TRS, XLR |
| Režim zvukového výstupu | Stereo |
| Typ montáže | Držiak na stôl |
| Výrobca | Sound Performance Lab |
10. Záruka a podpora
The SPL 2Control Monitor Controller comes with a limited warranty. For specific warranty terms, duration, and conditions, please refer to the documentation provided with your purchase or visit the official SPL website. For technical support, service, or inquiries, please contact the manufacturer, Sound Performance Lab, or your authorized dealer.
Výrobca: Sound Performance Lab