
1. Úvod
This manual provides detailed instructions for the installation, operation, and maintenance of the ASUS M4A87TD EVO motherboard. This ATX motherboard supports AMD Phenom II, Athlon II, and Sempron 100 Series Processors with an AM3 socket, offering robust performance for personal computer systems. Key features include AMD 870 & SB850 chipset, DDR3 memory support, CrossFireX technology, SATA 6Gb/s, and USB 3.0 connectivity.
2. Nastavenie a inštalácia
Správna inštalácia je kľúčová pre stabilnú prevádzku vášho systému. Postupujte podľa týchto krokov opatrne.
2.1 Motherboard Layout Overview
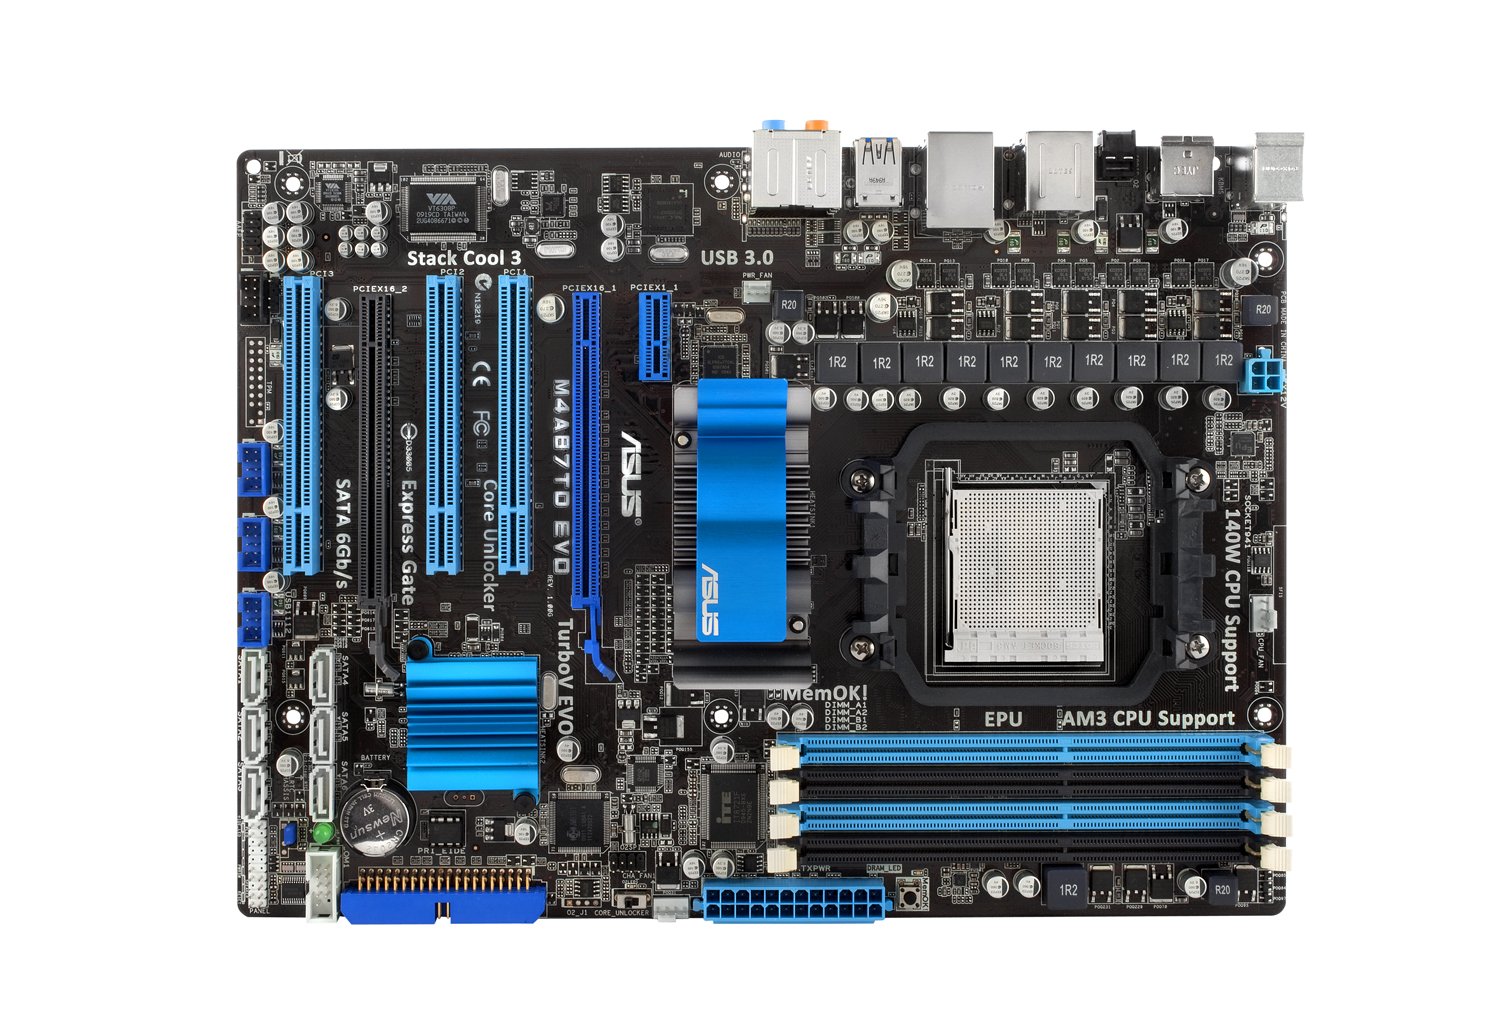
Obrázok 1: Úplný view of the ASUS M4A87TD EVO Motherboard, highlighting various components and connectors.
2.2 Inštalácia CPU
The motherboard features an AM3 socket for compatible AMD processors. Ensure the CPU is correctly oriented before placing it into the socket.
- Nájdite zásuvku CPU na základnej doske.
- Zdvihnite páku na zaťaženie na boku zásuvky.
- Zarovnajte trojuholníkovú značku na procesore so zodpovedajúcou značkou na pätici.
- Jemne vložte procesor do pätice bez použitia sily.
- Spustite páku na zaťaženie, aby ste zaistili procesor na mieste.
Obrázok 2: Detailný view of the AM3 CPU socket area on the motherboard.
2.3 Inštalácia pamäte (RAM)
The motherboard supports up to 16GB of DDR3 memory across four DIMM slots. For dual-channel operation, install memory modules in matched pairs.
- Otvorte klipy na oboch koncoch slotu DIMM.
- Zarovnajte zárez na pamäťovom module s výstupkom v slote DIMM.
- Pevne zatlačte na oba konce pamäťového modulu, kým klipy nezacvaknú na svoje miesto.
Obrázok 3: View of the four DDR3 DIMM slots for memory installation.
2.4 Inštalácia rozširujúcej karty
The motherboard includes two PCI-Express 2.0 x16 slots (supporting ATI CrossFireX), one PCI-Express 2.0 x1 slot, and three PCI slots.
- Select an appropriate expansion slot for your card (e.g., graphics card in a PCIe x16 slot).
- Odstráňte príslušný kryt slotu z puzdra počítača.
- Align the card with the slot and press down firmly until it is seated.
- Kartu pripevnite k puzdru skrutkou.
Figure 4: Expansion slots including PCI-Express x16, x1, and standard PCI slots.
2.5 Pripojenie úložného zariadenia
Connect SATA 6Gb/s (SATA3) and SATA 3Gb/s (SATA2) devices to the available ports.
- Identify the SATA 6Gb/s ports (typically labeled SATA6G_1, SATA6G_2) and SATA 3Gb/s ports.
- Connect one end of the SATA data cable to the motherboard port and the other end to your storage device (HDD/SSD).
- Ensure the storage device also receives power from the power supply unit.
Figure 5: SATA 6Gb/s and SATA 3Gb/s ports for connecting storage devices.
2.6 Prípojky napájania
Connect the main 24-pin ATX power connector and the 4-pin ATX 12V power connector from your power supply unit to the motherboard.
- 24-pinový napájací konektor ATX: Provides main power to the motherboard.
- 4-pinový napájací konektor ATX 12V: Provides additional power to the CPU.
2.7 Pripojenia zadného vstupno-výstupného panela
Connect peripheral devices to the rear input/output ports.
- Porty PS/2: Pre klávesnicu a myš.
- Porty USB 2.0/3.0: Pre rôzne USB zariadenia.
- eSATA2 Port: For external SATA devices.
- IEEE 1394 Ports: For FireWire devices.
- LAN port RJ45: Pre sieťové pripojenie.
- Audio vstupno-výstupné konektory: For speakers, microphone, and other audio devices.
- Optical S/PDIF Out: Pre digitálny zvukový výstup.
Figure 6: Rear I/O panel showing various connectivity options including USB 3.0, LAN, and audio ports.
3. Návod na obsluhu
After successful hardware installation, proceed with system startup and software configuration.
3.1 Initial Power On and BIOS Setup
- Pripojte monitor, klávesnicu a myš.
- Zapnite počítač.
- Stlačte tlačidlo DEL kláves počas spustenia na vstup do pomôcky nastavenia systému BIOS.
- Configure essential settings such as boot order, date, and time.
- Explore advanced features like Core Unlocker a TurboV EVO for performance tuning, if desired. Refer to the BIOS utility for detailed explanations of each setting.
- Uložte zmeny a ukončite BIOS.
3.2 Inštalácia operačného systému
Install your preferred operating system (e.g., Windows 10) from a bootable USB drive or optical disc.
3.3 Inštalácia ovládača
Install the necessary drivers for the motherboard components, including chipset, LAN, audio, and USB 3.0 drivers. These are typically provided on a support DVD or available for download from the ASUS webstránky.
4. Údržba
Regular maintenance helps ensure the longevity and stability of your motherboard.
- Odstraňovanie prachu: Pravidelne čistite prach zo základnej dosky a komponentov pomocou stlačeného vzduchu. Pred čistením sa uistite, že je systém vypnutý a odpojený od siete.
- Aktualizácie BIOSu: Skontrolujte podporu spoločnosti ASUS website for the latest BIOS updates. Updating the BIOS can improve compatibility and system stability. Follow the instructions provided by ASUS carefully during the update process.
- Kontroly komponentov: Ensure all cables and components are securely seated. Loose connections can lead to intermittent issues.
5. Riešenie problémov
Táto časť sa zaoberá bežnými problémami, s ktorými sa môžete stretnúť.
- Systém sa nezapne:
- Verify all power supply connections to the motherboard (24-pin ATX and 4-pin ATX 12V).
- Uistite sa, že je napájací zdroj zapnutý.
- Skontrolujte pripojenia vypínača na prednom paneli k základnej doske.
- Žiadny výstup na displej:
- Uistite sa, že grafická karta je správne umiestnená v slote PCIe a má dostatočné napájanie.
- Skontrolujte pripojenia monitora a uistite sa, že je monitor zapnutý a nastavený na správny vstup.
- If using integrated graphics (if available on your CPU/APU, though this board requires a discrete GPU), ensure the display cable is connected to the motherboard's video output.
- Problémy s pamäťou (RAM):
- Základná doska je vybavená DRAM LED that illuminates if there is an issue with memory detection.
- Reseat memory modules firmly in their slots.
- Test with one memory module at a time to identify a faulty stick or slot.
- Operating System Instability:
- Uistite sa, že všetky ovládače sú správne nainštalované a aktuálne.
- Check for overheating issues by monitoring CPU and chipset temperatures.
- Spustite diagnostické nástroje pamäte a skontrolujte chyby v pamäti RAM.
- USB Ports Remain Powered After Shutdown:
- This is a known characteristic for some configurations. To fully power off USB devices, either toggle the power supply switch off and on, or unplug and replug the power cable from the wall.
6. Špecifikácie
| Funkcia | Detail |
|---|---|
| Značka | ASUS |
| Číslo modelu | M4A87TD EVO |
| Zásuvka CPU | Zásuvka AM3 |
| Kompatibilné procesory | AMD Phenom II / Athlon II / Sempron 100 Series |
| Typ čipovej sady | AMD 870 & SB850 |
| Technológia pamäte RAM | DDR3 2000(O.C.)/1600/1333/1066 |
| Dostupné pamäťové sloty | 4 (Dual Channel, ECC/Non-ECC Un-buffered) |
| Maximálna veľkosť pamäte RAM | 16 GB |
| Rozhranie grafickej karty | PCI, PCI Express (2x PCIe 2.0 x16, 1x PCIe 2.0 x1, 3x PCI) |
| Podporovaný štandard systémovej zbernice | SATA 6Gb/s (SATA 3) |
| Total SATA Ports | 7 (6x SATA 6Gb/s, 1x eSATA2) |
| USB porty | 12x USB 2.0 (6 vzadu, 6 cez konektory), 2x USB 3.0 (vzadu) |
| Počet ethernetových portov | 1 (RTL8111E Gigabit LAN) |
| Zvuk | 8-Channel HD Audio, Optical S/PDIF Out |
| Napájací konektor | 1x 24-pinový ATX, 1x 4-pinový ATX 12V |
| Platforma | Windows 10 (Compatible) |
| Hmotnosť položky | 2.9 libry |
7. Informácie o záruke
The ASUS M4A87TD EVO motherboard comes with a 3-ročná záruka. For specific terms and conditions, please refer to the warranty card included with your product or visit the official ASUS support webstránky.
8. Podpora
Pre technickú pomoc, stiahnutie ovládačov alebo ďalšie informácie navštívte oficiálnu stránku podpory spoločnosti ASUS. website. You can typically find support resources by searching for your product model, M4A87TD EVO, on the ASUS webstránky.
Oficiálny produkt ASUS Webmiesto: https://www.asus.com/support/