
1. Úvod
This manual provides detailed instructions for the installation, operation, maintenance, and troubleshooting of your CSBST 24V 36V 48V 350W Electric Bike Controller Kit with G51 LCD Display. Please read this manual thoroughly before use to ensure proper function and safety.

Figure 1.1: The CSBST Electric Bike Controller Kit, including the brushless motor controller and the G51 LCD display unit.
2. Nastavenie a inštalácia
2.1 Komponenty súpravy
- 1 x Brushless Motor Controller (350W)
- 1 x G51 LCD Display Unit
2.2 Controller Wiring Diagram
Refer to the diagram below for the correct connection of the controller wires to your e-bike components. Ensure all connections are secure before powering on the system.

Figure 2.1: Detailed wiring diagram for the CSBST brushless motor controller, showing connections for throttle, Hall sensor, brakes, PAS sensor, battery, headlight power, and display.
2.3 Self-Learning Wire Procedure
The self-learning wires are used to match the controller with your motor during the initial setup or after a controller replacement. This process ensures optimal motor performance and correct rotation direction.
- Connect the battery, motor phase wires, and Hall sensor wires to the controller.
- Connect the two green self-learning wires together.
- Power on the display by pressing and holding the 'M' button for 3 seconds.
- The motor will automatically rotate. Allow it to run for approximately 10-20 seconds.
- If the motor rotates forward, disconnect the self-learning wires.
- If the motor rotates in reverse or makes noise, disconnect the self-learning wires, reconnect them, and the motor should then rotate forward.
- Once the self-learning is complete and the motor rotates correctly, disconnect the self-learning wires. They do not need to remain connected.

Figure 2.2: Illustration of connecting and disconnecting the self-learning wires for motor matching.
Video 2.1: A visual guide demonstrating the self-learning wire connection process and the initial setup of the controller and display.
2.4 Final Connections
After the self-learning process, connect the throttle and any other functional wires according to the controller's socket definitions. Unused functions can be left unconnected.

Obrázok 2.3: Koniecview of the installation steps, including connecting the battery, motor, self-learning wires, and other accessories.
3. Návod na obsluhu
3.1 G51 LCD Display Overview
The G51 LCD display provides real-time information and allows for various settings adjustments. It features a clear screen with backlight for visibility in different conditions.

Figure 3.1: The G51 LCD display showing battery power, speed, power assist level, and vehicle status indicators.
3.2 Basic Button Operations
- Turn ON/OFF the Meter: Stlačte a podržte M tlačidlo na 3 sekundy.
- Úprava úrovne asistencie: Stlačte tlačidlo + or - button to increase or decrease the assist level.
- Zobrazenie svetlometov: Stlačte a podržte + button for 3 seconds to turn on/off the lights.
- Cruise and Boost:
- When the bike is stopped: Press and hold the - button to activate 6km/h Boost. Press again to stop.
- When the bike is running: Press and hold the - button to close cruise control.
- Multifunkčná zobrazovacia plocha: Dotknite sa M button to switch between Total mileage, ODO, Single Mileage TRIP, Digital Vol, and TIME.
3.3 Advanced Settings (P-Parameters)
To enter the settings menu, press and hold both the + a - buttons simultaneously. Use the M button to navigate between parameters and the +/- buttons to adjust values. Press and hold + a - znova pre uloženie nastavení a ukončenie.
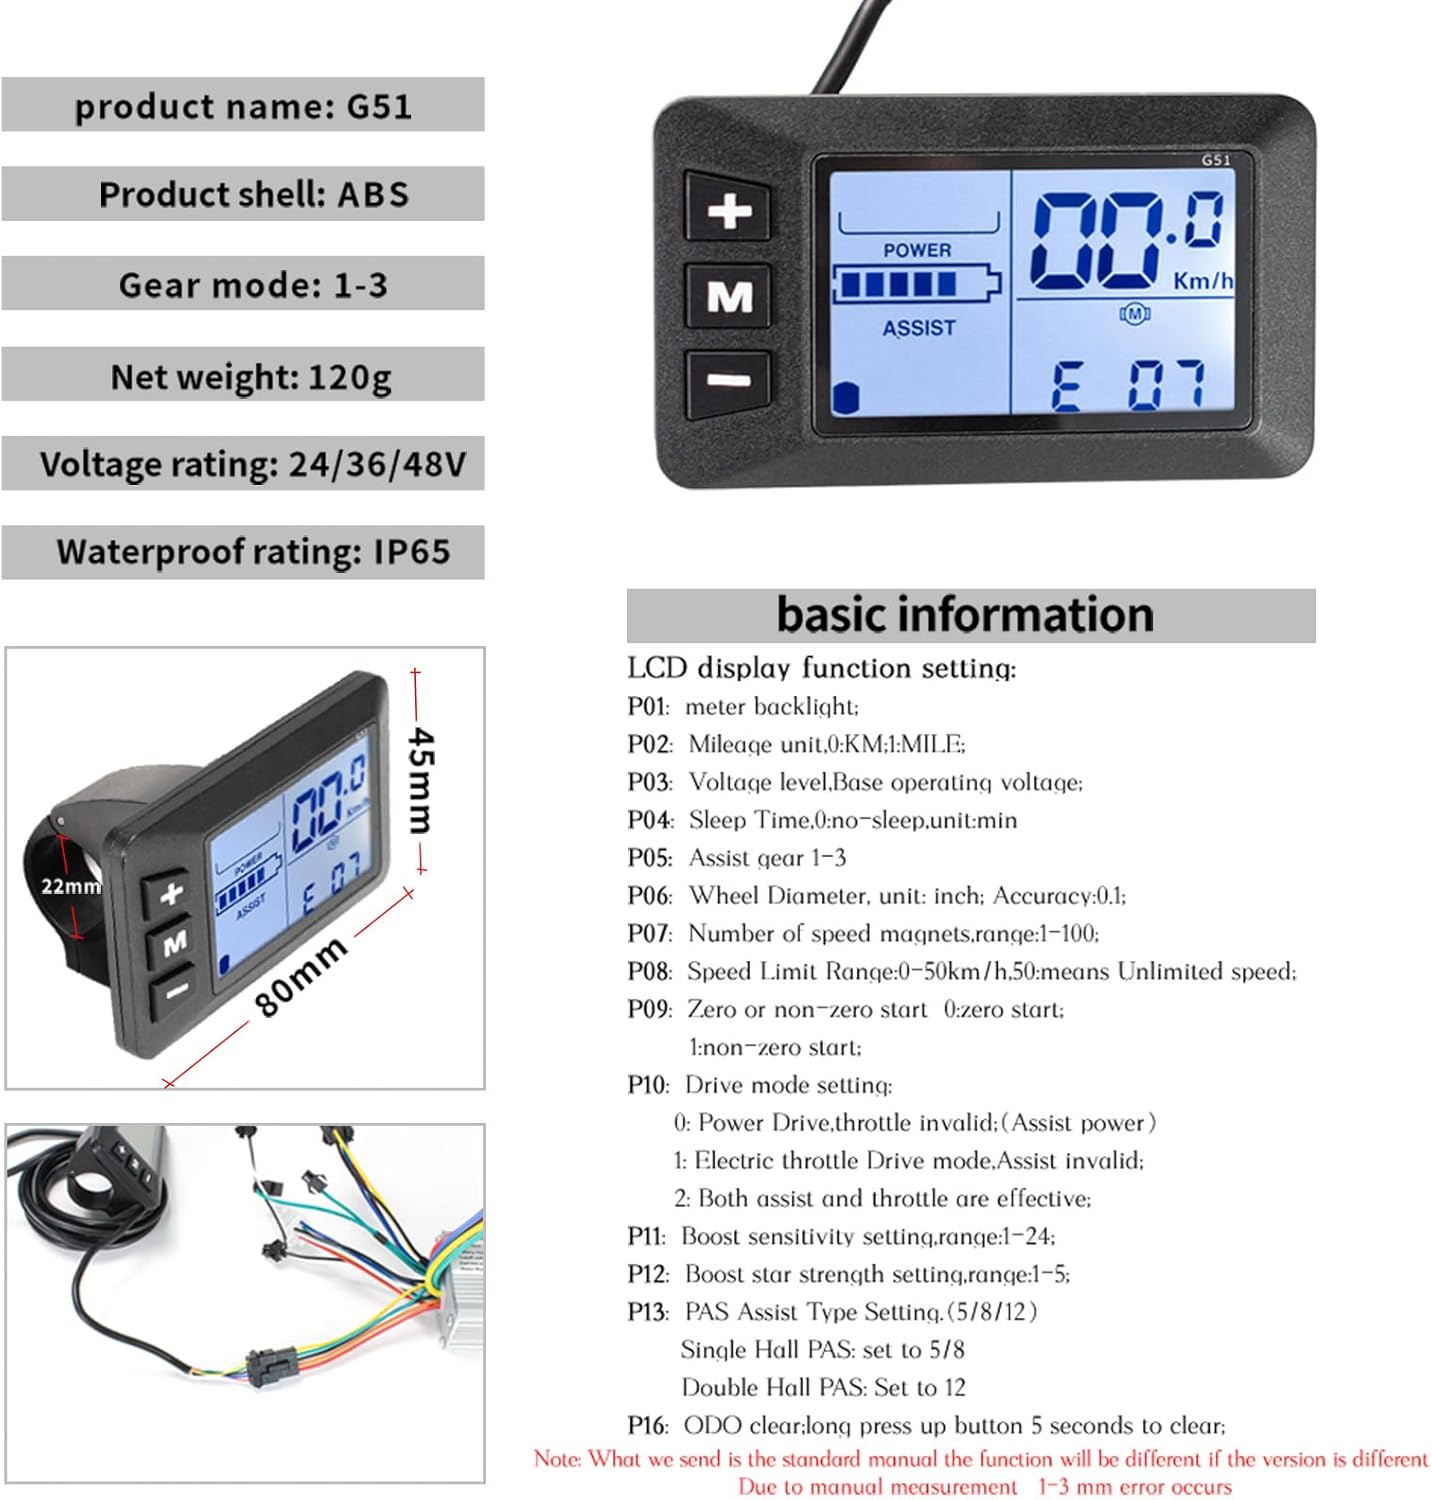
Figure 3.2: Basic information and P-parameter settings for the G51 LCD display, including backlight, mileage unit, voltage, and driving mode settings.
- P01: Backlight Brightness: Adjusts display backlight (1=darkest, 3=brightest).
- P02: Mileage Unit: Sets unit to Kilometers (Km) or Miles (Mi).
- P03: Zvtage Úroveň: Sets the base operating voltage (napr. 24 V, 36 V, 48 V).
- P10: Drive Mode Settings:
- 0: Power drive, throttle invalid.
- 1: Electric throttle drive mode, assist invalid.
- 2: Both assist and throttle are effective.
- P13: PAS Assist Type Settings: Configures the PAS sensor type (e.g., 5/8/12). Single Hall PAS: set to 5/8. Double Hall PAS: set to 12.
Video 3.1: A visual guide demonstrating the G51 LCD display's usage, including turning it on, adjusting assist levels, and navigating through the P-parameter settings.
4. Údržba
4.1 Všeobecná starostlivosť
To ensure the longevity and optimal performance of your controller kit, follow these general maintenance guidelines:
- Regularly inspect all wire connections for tightness and signs of wear or damage.
- Keep the controller and display clean. Wipe with a soft, damp plátno. Vyhnite sa agresívnym chemikáliám.
- Ensure the controller is mounted in a location with adequate airflow to facilitate heat dissipation.
4.2 Hydroizolácia
The G51 LCD display has an IP65 waterproof rating, meaning it is protected against dust and low-pressure water jets. While it can withstand splashes and light rain, it is not designed for submersion. If used in rainy conditions, wipe the display dry promptly after use.

Figure 4.1: The G51 LCD display is designed with IP65 waterproofing for use in various weather conditions.
5. Riešenie problémov
This section addresses common issues you might encounter with your CSBST Electric Bike Controller Kit.
| Problém | Možná príčina | Riešenie |
|---|---|---|
| Motor not running or running in reverse after installation. | Incorrect motor phase wire connection or self-learning not completed/incorrect. | Perform the self-learning wire procedure (Section 2.3). If motor still runs in reverse, try swapping two of the three motor phase wires. |
| Displej sa nezapne. | Loose power connection, low battery voltage, or faulty display/controller. | Check battery connection and charge level. Ensure display wire is securely connected to the controller. |
| Inaccurate speed reading on display. | Incorrect wheel diameter (P06) or magnet count (P07) setting. | Adjust P06 (wheel diameter) and P07 (magnet count) in the display settings (Section 3.3) to match your bike's specifications. Fine-tune using a GPS speed app if necessary. |
| Throttle not responding or assist not working. | Incorrect P10 (drive mode) or P13 (PAS assist type) setting. | Verify P10 is set to '1' (electric throttle) or '2' (both assist and throttle effective). Check P13 setting for correct PAS type. Ensure throttle and PAS sensor wires are connected correctly. |
6. Špecifikácie
Key technical specifications for the CSBST 350W Electric Bike Controller Kit:
| Funkcia | Špecifikácia |
|---|---|
| Značka | CSBST |
| Názov modelu | CONTROLLER350W-G51LCD |
| Číslo dielu | S6-61 Model |
| Voltage Kompatibilita | 24V, 36V, 48V |
| Menovitý výkon | 350 W |
| Aktuálny výstup | 17A |
| Controller Material | Hliník, Plast |
| Rozmery ovládača (D x Š x V) | 85 mm x 53 mm x 30 mm |
| Display Waterproof Rating | IP65 |
| Zahrnuté komponenty | 1 x Brushless Controller, 1 x LCD Display |
7. Informácie o záruke
This CSBST product comes with a 6-mesačná záruka from the date of purchase. This warranty covers manufacturing defects and material faults under normal use. It does not cover damage caused by misuse, accidents, unauthorized modifications, or improper installation. Please retain your proof of purchase for warranty claims.
8. Podpora
For technical assistance, troubleshooting beyond this manual, or warranty inquiries, please contact CSBST customer support through the retailer where the product was purchased. Provide your product model number and a detailed description of the issue for efficient service.