1. Úvod
This manual provides instructions for the assembly, operation, and maintenance of the MONTECH X5M Micro ATX Gaming PC Case. The X5M is designed for high airflow and features pre-installed ARGB fans, a glass side panel, and an integrated GPU holder.
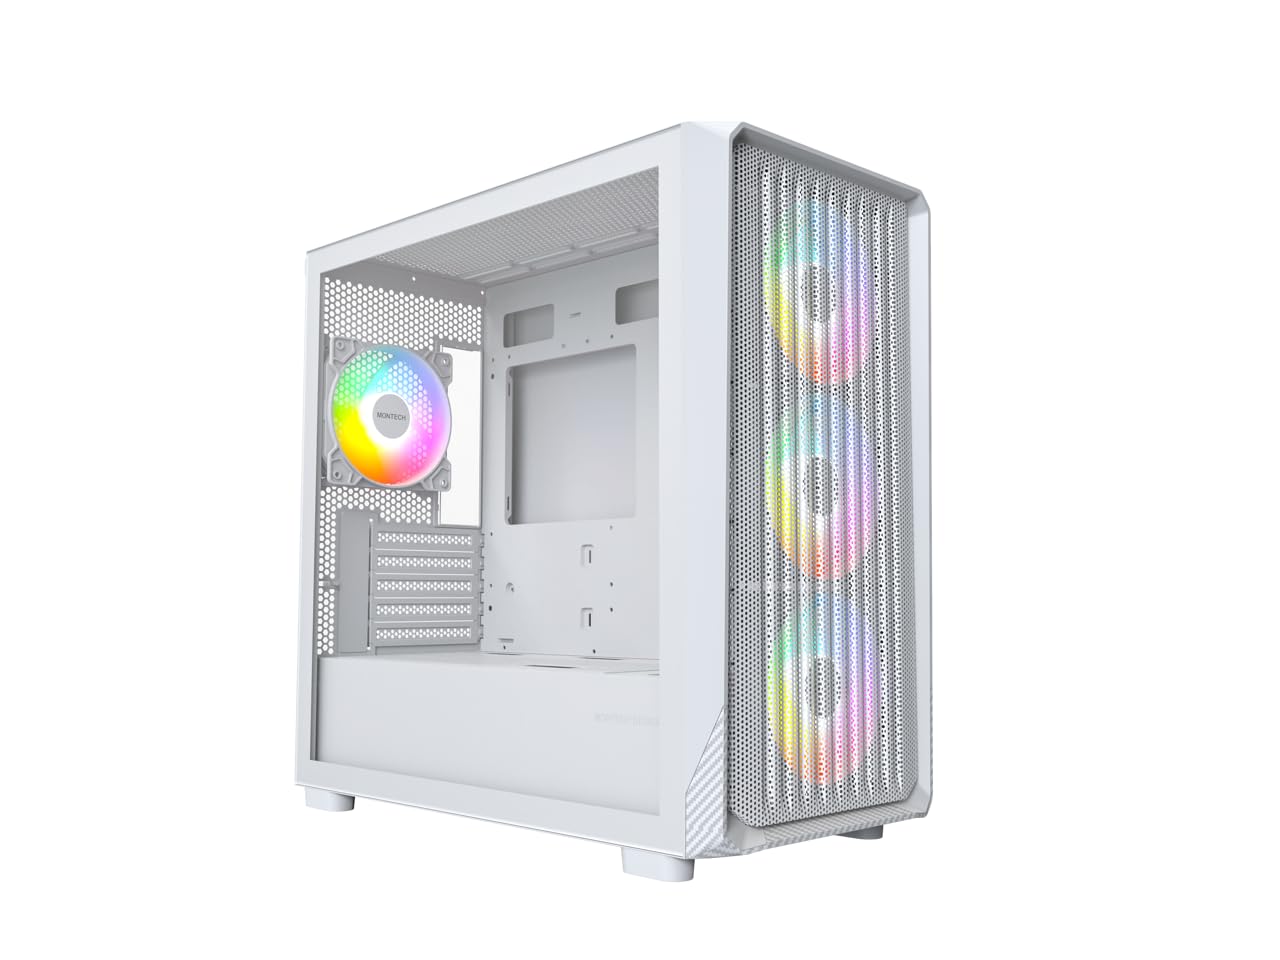
Figure 1: MONTECH X5M Micro ATX Gaming PC Case (White variant).
2. Kľúčové vlastnosti
- Integrovaný držiak grafickej karty: An adjustable GPU support stand is included to provide physical support for graphics cards.
- Dizajn s vysokým prietokom vzduchu: Optimized structure for efficient cooling.
- Predinštalované ARGB ventilátory: Four 120mm ARGB fans are pre-installed for immediate cooling and customizable lighting.
- Bočný panel z tvrdeného skla: Poskytuje jasné view vnútorných komponentov.
- Carbon Fiber Print Accents: Aesthetic detailing on the front panel.
- Všestranná konektivita: Front I/O panel includes USB 2.0, USB 3.0, USB Type-C, and audio ports.

Obrázok 2: Koniecview of the MONTECH X5M case highlighting internal layout and ARGB fans.
3. Špecifikácie
| Značka | Montech |
| Názov modelu | X5M |
| Typ prípadu | Micro ATX Mid Tower |
| Kompatibilita základnej dosky | Micro ATX |
| Predinštalované ventilátory | 4 x 120 mm ARGB ventilátory |
| Podpora dĺžky GPU | Až do 405 mm |
| Podpora výšky chladiča CPU | Až do 165 mm |
| Podpora dĺžky zdroja | Až do 230 mm |
| Skladovacie priestory | Up to 2 HDDs & 4 SSDs |
| Predné I / O porty | 1x USB 2.0, 1x USB 3.0, 1x USB Type-C, Mic & Audio, LED Button, Power Button |
| Spôsob chladenia | Vzduch |
| Podpora chladiča AIO | Top: Up to 360mm; Front: Up to 360mm |
| Materiál | Plastic with Carbon Fiber Accents, Tempered Glass |
| Hmotnosť položky | 14.3 libier (6.49 kg) |

Figure 3: Close-up of the carbon fiber print detailing on the front panel of the X5M case.
4. Nastavenie a inštalácia
Follow these steps for installing components into your MONTECH X5M PC case. Ensure your system is powered off and unplugged before beginning any installation.
4.1. Príprava prípadu
- Carefully remove the tempered glass side panel by unscrewing the thumb screws and sliding it off.
- Odstráňte zadný bočný panel, aby ste získali prístup k oblasti na správu káblov.
4.2. Inštalácia základnej dosky
- Nainštalujte kryt I/O (ak nie je vopred pripojený k základnej doske) do zadného otvoru v skrinke.
- Zarovnajte základnú dosku Micro ATX s dištančnými výstuhami vo vnútri skrinky.
- Základnú dosku upevnite pomocou dodaných skrutiek.
4.3. Inštalácia napájacieho zdroja (PSU)
- Place the PSU into the dedicated compartment at the bottom rear of the case.
- Upevnite zdroj skrutkami zo zadnej strany skrinky.
4.4. Storage Device Installation (HDDs/SSDs)
The X5M supports up to 2 HDDs and 4 SSDs.
- 2.5" SSD disky: Mount SSDs onto the designated brackets behind the motherboard tray or on the PSU shroud.
- 3.5" pevné disky: Install HDDs into the drive cage located under the PSU shroud.
4.5. Inštalácia grafickej karty (GPU)
- Odstráňte potrebné kryty slotov PCIe zo zadnej strany skrinky.
- Vložte grafickú kartu do príslušného slotu PCIe na základnej doske.
- Upevnite grafickú kartu skrutkami.
- Adjust the integrated GPU support stand to provide stability for your graphics card.
4.6. Inštalácia ventilátora a radiátora
The X5M comes with four 120mm ARGB fans pre-installed. Additional fans or AIO radiators can be installed as follows:
- Hore: Supports 3x 120mm or 2x 140mm fans, or AIO radiators up to 360mm.
- Predná časť: Supports 3x 120mm or 2x 140mm fans, or AIO radiators up to 360mm.
- zadná časť: Podporuje 1x 120 mm ventilátor.
- PSU kryt: Podporuje 2x 120 mm ventilátory.

Figure 4: Illustration of airflow within the MONTECH X5M case and the pre-installed ARGB fans.

Figure 5: Diagram detailing fan and radiator support locations and sizes within the X5M case.
4.7. Správa káblov
Na usporiadanie káblov využite výrezy na vedenie káblov a úchyty za priehradkou na základnú dosku. Zlepší sa tým prúdenie vzduchu a estetika.
4.8. Pripojenia predného vstupno-výstupného panela
Connect the front panel cables (USB 2.0, USB 3.0, USB Type-C, HD Audio, Power Switch, Reset Switch, LED) to the corresponding headers on your motherboard. Refer to your motherboard manual for specific header locations.

Figure 6: Front I/O panel of the MONTECH X5M, showing USB 2.0, USB 3.0, USB Type-C, Mic & Audio jacks, LED button, and Power button.
5. Prevádzka
5.1. Zapnutie
After all components are installed and cables connected, replace the side panels. Connect your monitor, keyboard, mouse, and power cable. Press the Power Button on the front I/O panel to start your system.
5.2. Ovládanie ventilátora ARGB
Predinštalované ARGB ventilátory je možné ovládať dvoma spôsobmi:
- Dedicated LED Button: Use the LED button on the front I/O panel to cycle through 25 built-in lighting modes.
- Synchronizácia základnej dosky: Connect the ARGB cables to a compatible 5V 3-pin ARGB header on your motherboard. Use your motherboard's RGB software (e.g., ASUS Aura Sync, MSI Mystic Light Sync, GIGABYTE RGB Fusion, ASRock Polychrome Sync) to synchronize and customize lighting effects.
6. Údržba
Pravidelná údržba pomáha zabezpečiť optimálny výkon a dlhú životnosť komponentov vášho počítača.
- Čistenie prachového filtra: Periodically remove and clean the dust filters (located on the top, front, and bottom) to maintain optimal airflow. Use compressed air or a soft brush.
- Čistenie exteriéru: Vonkajšie povrchy utrite mäkkou, damp plátno. Vyhnite sa abrazívnym čistiacim prostriedkom.
- Čistenie interiéru: Keď je systém vypnutý a odpojený od siete, pomocou stlačeného vzduchu odstráňte prach z vnútorných komponentov a ventilátorov.
7. Riešenie problémov
- Systém sa nezapne:
- Uistite sa, že napájací kábel je bezpečne pripojený k zdroju PSU a k elektrickej zásuvke.
- Check that the PSU switch is in the "ON" position.
- Verify all front panel connectors (especially the Power Switch) are correctly attached to the motherboard.
- Confirm the 24-pin ATX and 8-pin CPU power cables are securely connected to the motherboard.
- Fans Not Spinning / RGB Not Lighting Up:
- Check that all fan power cables are securely connected to the fan hub or motherboard headers.
- Ensure ARGB cables are properly connected to the fan hub or a compatible 5V 3-pin ARGB header on the motherboard.
- If using motherboard synchronization, verify that the RGB software is installed and configured correctly.
- Try cycling through modes using the dedicated LED button on the front panel.
- Žiadny výstup na displej:
- Ensure your monitor cable is connected to the graphics card (GPU) and not the motherboard's integrated graphics port (unless you are using integrated graphics).
- Znovu vložte grafickú kartu do slotu PCIe.
- Check that the GPU power cables are securely connected.
8. Záruka a podpora
8.1. Informácie o záruke
The MONTECH X5M PC Case comes with a 1-ročná záruka výrobcu. This warranty covers defects in materials and workmanship under normal use. For specific terms and conditions, please refer to the official Montech webalebo kontaktujte zákaznícku podporu.
8.2. Zákaznícka podpora
For further assistance, technical support, or warranty claims, please visit the official Montech website or contact their customer service department. You can find contact information on the Montech webmiesto: www.montechpc.com